What are Facebook Tracking Pixels and why you should be using them on your website.
Facebook tracking Pixels provide a very powerful way for you to build custom audiences for your Facebook ad campaigns and track how users interact with the content on your website.
What are Facebook Tracking Pixels?
There are many different types of Facebook Tracking Pixels and they all serve a specific purpose. Some are designed to simply track users on your website, others are designed to track users who go to specific pages of your website such as cart or checkout pages.
How do Facebook Tracking Pixels work?
When you put a Facebook Tracking Pixel on your website it sends back user data to your Facebook ad manager account. This is incredibly beneficial for your Facebook ad campaigns. Now you can specificity set your ads to target users who have been on your website.
Where the pixel is incredibly powerful is it lets you track and send ads to people who do specific things on your website such as fill out a form or go to the cart or checkout pages.
Say you want to create an ad for people who are very interested in your products. With the Facebook pixel installed on the cart and checkout pages you can now specifically target ads to users who have been on those pages. In the case of the eCommerce websites if you are getting a lot of abandons on the cart or checkout page you can send follow up ads and try to reconnect with those users again through targeted Facebook ads.
How to create a Facebook Tracking Pixel
In order to create a pixel you will need a Facebook account as well as an ads manager account.
Step 1 Go to your ads manger account
Step 2 Go to the Facebook Pixel Tab or Tools Tab
Step 3 Click on Create a Pixel
Step 4 Create a name for your pixel. You can only have one pixel per ad account, so choose a name that represents your business.
Step 5 Click the except terms box and then click Create Pixel
That is it, your Facebook pixel is created!
How to obtain your pixel code and put it on your website.
- Step 1 Go back to the Facebook pixel tab and click on actions and then View Pixel Code.
- Step 2 Copy the code and then proceed to your website.
Note: if you are unsure how to add custom code to your website send the code to your website admin or hire a web developer to help. Need help? Click here….
- Step 3 Add the pixel code to the head section of your website. The code should be on all pages that you want to track.
Types of pixel codes
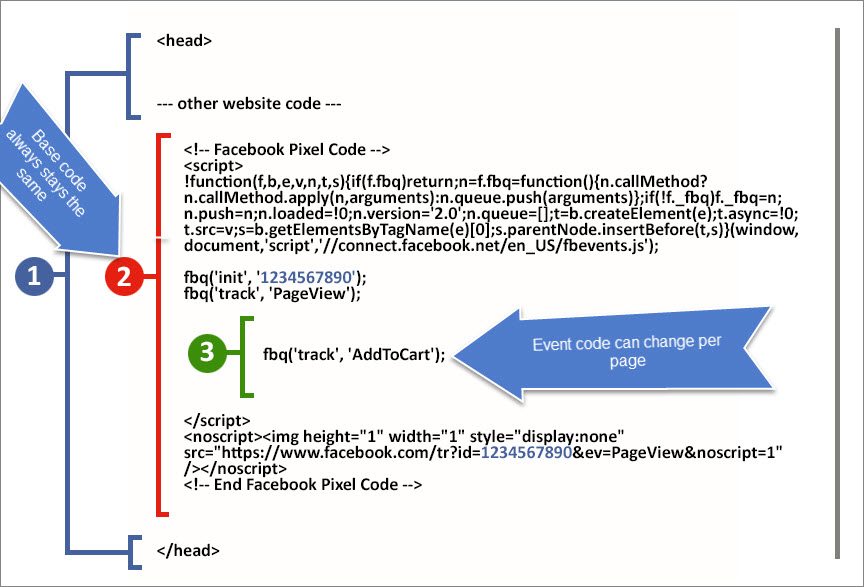
There are two different types of code that you will be embedding into the head sections of your website pages.
The Pixel base code and the Event Code

The pixel base code has to be the same on all pages that you want to track. The event code can change depending on the type of content you want to track on that page.
- View Content
- Search
- Add to cart
- Add to wishlist
- Initiate checkout
- Add payment info
- Make Purchase
- Lead
- Complete Registration
Now that the pixel code has been added to your website pages, the data will be sent back to your ads manager account where you can view the information and create targeted ads with it.
How to know if the pixels code is setup correctly on your website.
![]()
Facebook has created a special application called the Facebook Pixel Helper. When you have this installed in your browser you will be able to see if there are Facebook pixels installed on the web pages that you are browsing and if there are what types are being used. For more information on installing the Pixel Helper please click the link below. https://developers.facebook.com/docs/ads-for-websites/pixel-troubleshooting


