Wrapping Bird Bodies

0
28436

IMO, there is no cheaper or easier way to make a custom body, than wrapping your own. when I was taught how to do this, almost 40 years ago, if you didn’t wrap, you most likely did not do birds, since foam bodies were just starting to emerge for taxidermists. the materials needed were, and still are cheap, and are readily available. this method allows you to duplicate, right from the carcass, exactly what needs to be put back in, and allows you to pre shape for the pose you choose. if done properly, there is very little fill if any needed, wire anchoring is solid, and feather grooming is far easier than over a foam body. I am sure there are alternate ways to wrap, and I will share how I was taught and still use today.
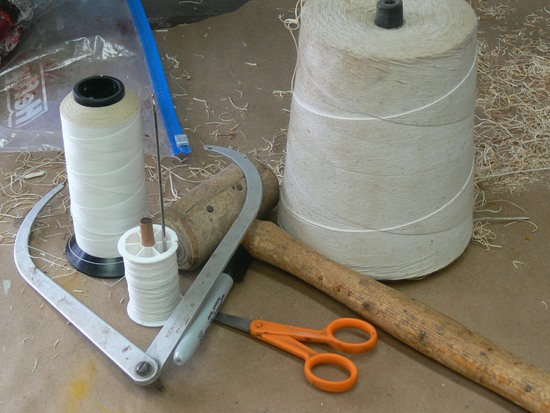
material list is as follows:
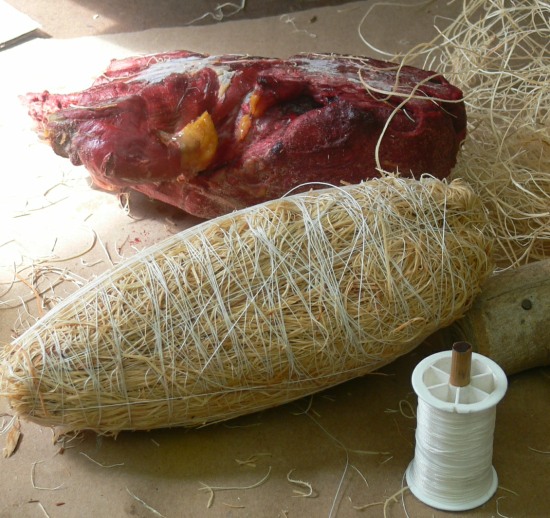
fine grade excelsior
button and coat thread
calipers
sharpie
butchers twine
leather mallet
post mortem needle
I dissolve in hot water, borax and Para Flakes (moth flakes)
soak the excelsior over night. I do a 5 gallon bucket at a time
you are now ready to start

1-1

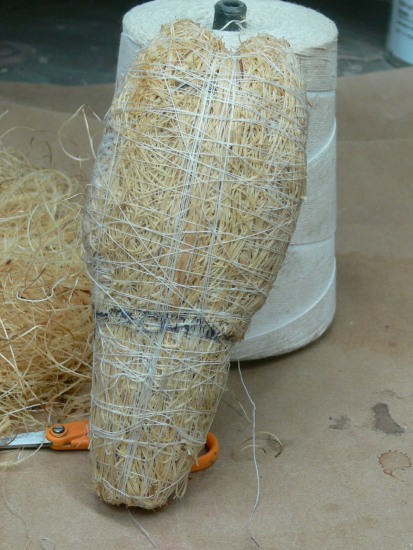
from there, I remove my pre shaped and frozen carcass from the freezer for my actual reference. in this case a Drake Surf Scoter. this is going to be a dead mount of three scoter drakes, Black, Surf and White Wing. With that said, I want to elongate my body a tad, and over wrap somewhat the size to compensate for de fatting let out. I make two separate “flats” as I call them, and rough in the shape with the mallet, and bind these two core parts with thread. this is the heart of the body. the two photos show both the rough shaping, and the fine tuning of the 2 core pieces

2a 2

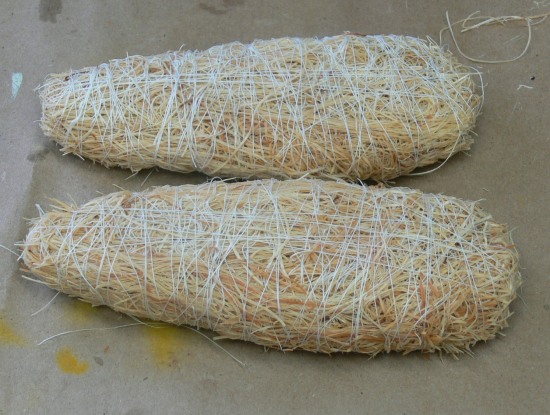
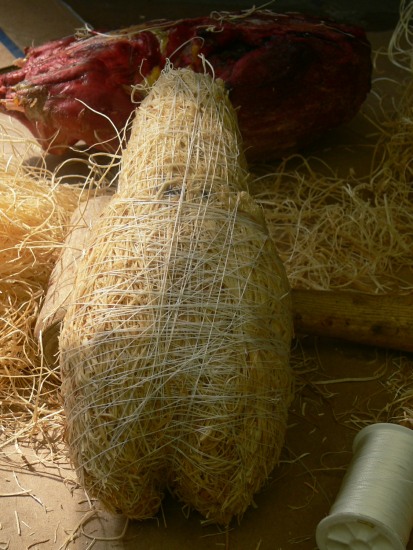
I then marry together the two wedges, bending, and spreading them at the neck junction to form the neck pocket. excelsior filler is added along the back, and stuffed to spread the belly area. I use the mallet to beat the excelsior into a balanced and uniform core, this is the heart of the body

3a 3

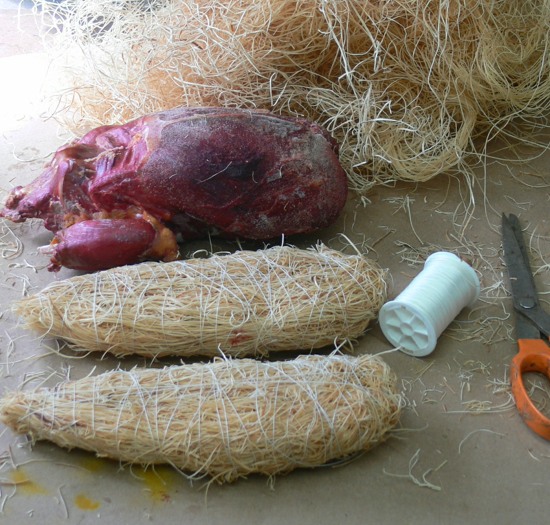
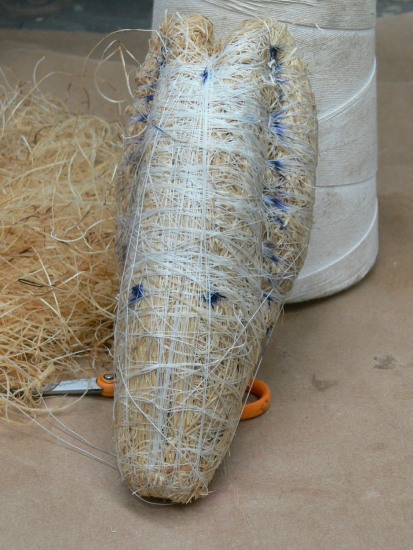
Ok, from here, I mark my connection points, chest and belly muscle, that now is added to the core. accuracy is very easy when you have the carcass right in front of you, and if you need to adjust the carcass its right there, and you can duplicate any changes in body shape and duplicate that onto your wrapped body

p1050188

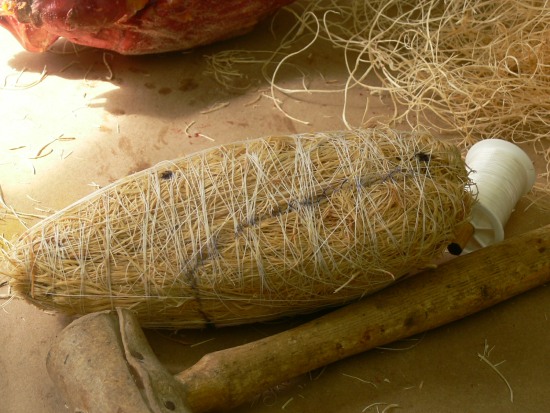
now it’s time to build up our core body. this is when I add the more excelsior to duplicate the natural muscle that shows from the carcass. I pre trim the excelsior with scissors as I apply to the core, and use the leather mallet to help in shaping as I wrap. bottom view, belly and chest done

p1050190

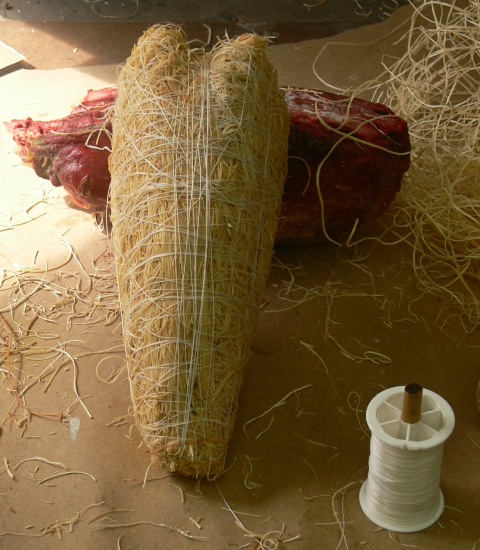
when I am satisfied with the wrapping part of making a body, it’s time to do some fine tuning to areas that need more definition. this is where the butchers twine and post mortem needle are used. the twine is very strong, so you can put a lot of tension on it without it breaking. I just sew from one side of the body to the other, pulling tight to compress the body to define detail. I do this from the wing to body junction to the belly. done correctly, you now have a nice wing pocket

p1050191

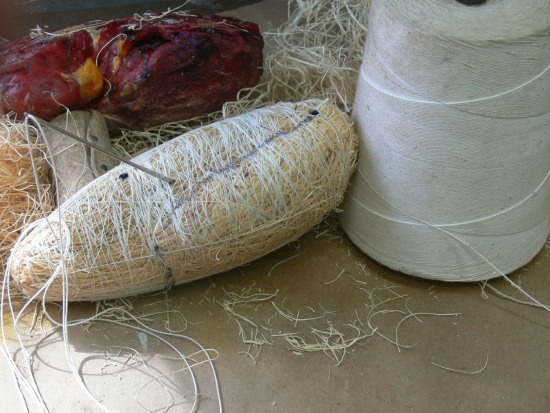
when I am satisfied, and after a test fit in the skin, I make any adjustments that are needed. you can beat this wrapped body into just about any pose with the leather mallet. time to chuck the carcass, and I now re soak and put it in the freezer till it’s time to mount. I do not mount on a dry body, but a damp one. that gives me more time to preen, as the bird dries. also note, that I mount with full wing bones as well as leg bones. this method offers a fully articulated replacement, without having to guess, like the foam and half leg technique. I am sure this is not for everyone, and I am sharing what I was taught, and still use today in all my bird mounts. hope this helps anyone interested in this old school method. finished body photos below

zzzzz-003 zzzzz-002 zzzzz-001

SHARE
Previous articleMcKenzie Buys Knoblochs Chemicals
Next articleProper Guard Setting
Like so many boys growing up, I had always hoped to someday be able to make a living doing what I enjoyed so much……being outdoors, and anything having to do with nature. My growing passion for animals in any form, and my obsession with fishing built a foundation and a wonderful understanding to all the ways to enjoy the outdoors and everything in it. I loved to draw and paint, and spent countless hours learning to put what I had seen on paper. Fish were a favorite subject and specimens were readily available at the docks in Oyster Bay, LI. “Sagamore Hill”, Teddy Roosevelt’s home was just around the corner, and it was there, after many trips to view his trophies, that my interest in taxidermy spurred a lifelong passion. Trips to the American Museum of Natural History, the Bronx Zoo and Coney Island Aquarium became very frequent, and I could not wait for my next lesson from the Northwestern School of Taxidermy to arrive in the mail. Road kills were never left without examination, and my salvaged fly tying materials were steadily turning into a nice collection of skins, tails, wings and feathers. By ninth grade, I moved from LI, NY to Cumberland, Maryland. Great Maryland fishing as well as Maryland turkey and Maryland deer hunting was everywhere in Western Maryland, and I did as much as possible. After graduation in 1971, I moved to Ocean City, Maryland and landed a mate job on a charter boat and then a commercial long- liner. It was there, that Maryland Taxidermy came to mind. I learned to mold and cast reproduction fish. Winters were spent hunting Maryland waterfowl and the wild Sika deer of Assateague Island. I had plenty of specimens further my experience, and knew that becoming a Maryland Taxidermist was sure to happen. In 1979, I moved from Ocean City to Kent Island, Maryland on the eastern shore of the Chesapeake Bay. This area was then a Goose hunting mecca, and hunters from everywhere came to hunt the Canada and Snow geese. Maryland’s eastern shore, is also known for its heavy racked trophy Whitetail Deer. That year I opened Kent Island Taxidermy and became a Maryland deer checking station. The combination of my fishing charter business and new Maryland Taxidermist business worked very well together. I joined the Maryland Taxidermist Association, served on it’s board and as president. I was co-writer of the Maryland Big Buck Contest as well implementing a Maryland Taxidermist Licensing test, now required through the Maryland Dept. of Natural Resources. Besides my USCG 100 Ton Ocean Master Unlimited Captains License, I was also a registered and licensed guide in New York and West Virginia. When the Maryland DNR implemented the new Maryland Guide License, I was one of the first to qualify, and meet the requirements. Many of my clients hunted and fished worldwide, and I saw the need to offer assistance in Importing/Exporting their trophies. I applied for and received a non designated port permit for game trophies as well as becoming Maryland’s first USDA Approved Establishment for restricted products. The opportunity to preserve so many diverse species has and continues to be a very rewarding challenge. It had always been my intention to maintain control over the technical and artistic aspects of taxidermy and animal preservation. From start to finish, it was my goal and has been to maintain a sole proprietorship. Every completed trophy is totally done by me, technically sound, anatomically accurate and artistically pleasing. Anything is possible, and I look forward and enjoy pushing the limits of “taxidermy”, as a respected art form. I love my job, and love what I do…even after all these years…and look forward to many more years of taxidermy, preparation and animal artistry.