This Article is from TTN author, D. Price
[avatar user=”D.Price” size=”thumbnail” align=”right” link=”file” target=”_blank” /]
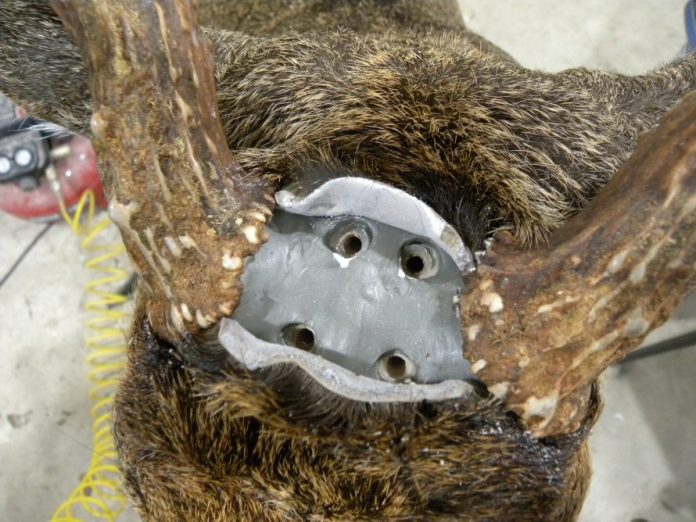
Still, I receive “How To” questions regularly because I use a burr to burr incision. Folks who are not used to this method have trouble picturing exactly how to set the antlers. So, I decided to break it down step by step to help explain exactly how I pull this off. Here it is, pretty simple really! All of this plus much more is covered in video format in my online video series “High Quality Whitetail Taxidermy”
Cleaning
First thing you want to do is cut the skull plate like you would for any other antler set method. You will need to clean the skull plate, removing any excess dried flesh or membrane. You do not want anything left behind that will attract insects. The easiest way I have found to do this is using a Dremel with a course sanding drum. This will make short work of the job. Once you get up to and around the burs change out your sanding drum to a small grinding bit. This will allow you to clean out from up under the burrs without damaging them. Make sure to clean the bottom side of the skull plate as well.
Initial Antler Set
Next, drill your holes into the skull plate to accept the screws for fastening to the manikin. Now mix just enough Bondo to fill up the brain cavity of the deer. Place the Bondo onto the top of the manikin where the antlers attach and set the antlers into place. Mix the Bondo fairly hot so you don’t have to hold the rack as long while the Bondo is curing.
Okay, now that the Bondo has cured you can let go of the rack. Take a moment to check from all angles to make sure the antlers are set at the proper location and angles. Once satisfied with the look, simply pop them loose from the manikin. Using SC Johnson’s Wax apply a liberal coat to the manikin where the antlers will sit. Run your drill bit back through the screw holes in the skull plate to remove the Bondo. Next carefully replace the rack back where you originally had it attached. There most likely will be a seam line or a small hole from where the supply company installed the head block. This will help you to realign the rack perfectly as the Bondo will lock into these areas.
Transition Sculpting into the form
Now that you have the antlers in the correct location, reattach them with all four screws. Next, mix up enough Apoxie Sculpt to rebuild the top of the head and the skull plate into the manikin. Using the Apoxie Sculpt rough in around your burrs and filling in areas where muscle tissue was removed. Don’t worry about your screws, we will address them shortly, go right on over the top of them as well. Next start shaping and moving the Apoxie Sculpt into the areas where needed to get the anatomically correct look. Once you have the look you desire, smooth it all out using Aves Studies Safety Solvent. Thin out the Apoxie Sculpt as you near the bottom side of the burrs so the skin will fit nicely.
Now that you have all that completed it is time to uncover the screws. With a modeling tool, cut out around the screws and scoop the Apoxie Sculpt out exposing the screw head. The screws are not that hard to find and with a little practice you will know exactly where they are. Once you have the screw heads uncovered move on to your eye work, form and cape prep. Do this while waiting for the Apoxie Sculpt to kick. When it has completely cured remove the screws. By applying the wax previously and a slight bump on one side of the antlers they will pop off. Clean as much of the wax off as possible, you do not want wax getting in the hair during mounting.
Finishing Up
Moving on you are going to go ahead and mount the whitetail as usual, except for attaching the rack. You can mount it up completely without the antlers being in the way.
Once everything is done, you can slide the skull plate into the skin opening and screw it into place. It should line up perfectly with your pilot holes from the previous attachment, then reinsert your screws. Using critter clay fill in the holes over the screw heads (this makes the screws easily removable if needed). Lift up the forehead skin and using a small brush apply hide paste onto the forehead area of the manikin. Make sure that the skin is tucked up underneath the burrs. You can now sew up the two inch incision. Once sewing is complete, with your fingers you can maneuver the hide paste under the forehead. Make sure to get it up and around the burrs as well as under the seam you just sewn. This will ensure a nice finished seam with very limited shrinkage and pulling around the antler burrs.
DP
You can learn more about all of the products and services D. Price offers at www.fleshingmachines.com


