Visit the Taxidermy Talk forums to network with members, catch up on the latest news and learn new techniques . Join the forum and ask questions relating to taxidermy and business. Our experts will give you a timely answer !

Visit the Taxidermy Talk forums to network with members, catch up on the latest news and learn new techniques . Join the forum and ask questions relating to taxidermy and business. Our experts will give you a timely answer !

[avatar user=”D.Price” size=”thumbnail” align=”right” link=”file” target=”_blank” /]
Still, I receive “How To” questions regularly because I use a burr to burr incision. Folks who are not used to this method have trouble picturing exactly how to set the antlers. So, I decided to break it down step by step to help explain exactly how I pull this off. Here it is, pretty simple really! All of this plus much more is covered in video format in my online video series “High Quality Whitetail Taxidermy”
First thing you want to do is cut the skull plate like you would for any other antler set method. You will need to clean the skull plate, removing any excess dried flesh or membrane. You do not want anything left behind that will attract insects. The easiest way I have found to do this is using a Dremel with a course sanding drum. This will make short work of the job. Once you get up to and around the burs change out your sanding drum to a small grinding bit. This will allow you to clean out from up under the burrs without damaging them. Make sure to clean the bottom side of the skull plate as well.
Next, drill your holes into the skull plate to accept the screws for fastening to the manikin. Now mix just enough Bondo to fill up the brain cavity of the deer. Place the Bondo onto the top of the manikin where the antlers attach and set the antlers into place. Mix the Bondo fairly hot so you don’t have to hold the rack as long while the Bondo is curing.
Okay, now that the Bondo has cured you can let go of the rack. Take a moment to check from all angles to make sure the antlers are set at the proper location and angles. Once satisfied with the look, simply pop them loose from the manikin. Using SC Johnson’s Wax apply a liberal coat to the manikin where the antlers will sit. Run your drill bit back through the screw holes in the skull plate to remove the Bondo. Next carefully replace the rack back where you originally had it attached. There most likely will be a seam line or a small hole from where the supply company installed the head block. This will help you to realign the rack perfectly as the Bondo will lock into these areas.
Now that you have the antlers in the correct location, reattach them with all four screws. Next, mix up enough Apoxie Sculpt to rebuild the top of the head and the skull plate into the manikin. Using the Apoxie Sculpt rough in around your burrs and filling in areas where muscle tissue was removed. Don’t worry about your screws, we will address them shortly, go right on over the top of them as well. Next start shaping and moving the Apoxie Sculpt into the areas where needed to get the anatomically correct look. Once you have the look you desire, smooth it all out using Aves Studies Safety Solvent. Thin out the Apoxie Sculpt as you near the bottom side of the burrs so the skin will fit nicely.
Now that you have all that completed it is time to uncover the screws. With a modeling tool, cut out around the screws and scoop the Apoxie Sculpt out exposing the screw head. The screws are not that hard to find and with a little practice you will know exactly where they are. Once you have the screw heads uncovered move on to your eye work, form and cape prep. Do this while waiting for the Apoxie Sculpt to kick. When it has completely cured remove the screws. By applying the wax previously and a slight bump on one side of the antlers they will pop off. Clean as much of the wax off as possible, you do not want wax getting in the hair during mounting.
Moving on you are going to go ahead and mount the whitetail as usual, except for attaching the rack. You can mount it up completely without the antlers being in the way.
Once everything is done, you can slide the skull plate into the skin opening and screw it into place. It should line up perfectly with your pilot holes from the previous attachment, then reinsert your screws. Using critter clay fill in the holes over the screw heads (this makes the screws easily removable if needed). Lift up the forehead skin and using a small brush apply hide paste onto the forehead area of the manikin. Make sure that the skin is tucked up underneath the burrs. You can now sew up the two inch incision. Once sewing is complete, with your fingers you can maneuver the hide paste under the forehead. Make sure to get it up and around the burrs as well as under the seam you just sewn. This will ensure a nice finished seam with very limited shrinkage and pulling around the antler burrs.
DP
You can learn more about all of the products and services D. Price offers at www.fleshingmachines.com

October 16th 2016 by Aaron Stehling – Taxidermy Talk News
To celebrate the start of hunting season, we have revamped the website. The new site features an expanded news section on the home page that covers Taxidermy Industry News, Business , Tech, and Sponsor updates. You will see the stories covered under ” Taxidermy Talk News”. Have something we should be reporting on ? Let us know about it ! Email taxidermytalk@gmail.com .
We are also very exited to add an expanded How To article section to the site. Our authors cover a wide range of topics and provide their expertise through their articles at no charge to you.
The forum has also been updated with some new features.
We would love to hear your feedback on the changes to the site !
![]()

Facebook tracking Pixels provide a very powerful way for you to build custom audiences for your Facebook ad campaigns and track how users interact with the content on your website.
There are many different types of Facebook Tracking Pixels and they all serve a specific purpose. Some are designed to simply track users on your website, others are designed to track users who go to specific pages of your website such as cart or checkout pages.
When you put a Facebook Tracking Pixel on your website it sends back user data to your Facebook ad manager account. This is incredibly beneficial for your Facebook ad campaigns. Now you can specificity set your ads to target users who have been on your website.
Where the pixel is incredibly powerful is it lets you track and send ads to people who do specific things on your website such as fill out a form or go to the cart or checkout pages.
Say you want to create an ad for people who are very interested in your products. With the Facebook pixel installed on the cart and checkout pages you can now specifically target ads to users who have been on those pages. In the case of the eCommerce websites if you are getting a lot of abandons on the cart or checkout page you can send follow up ads and try to reconnect with those users again through targeted Facebook ads.
In order to create a pixel you will need a Facebook account as well as an ads manager account.
Step 1 Go to your ads manger account
Step 2 Go to the Facebook Pixel Tab or Tools Tab
Step 3 Click on Create a Pixel
Step 4 Create a name for your pixel. You can only have one pixel per ad account, so choose a name that represents your business.
Step 5 Click the except terms box and then click Create Pixel
That is it, your Facebook pixel is created!
Note: if you are unsure how to add custom code to your website send the code to your website admin or hire a web developer to help. Need help? Click here….
There are two different types of code that you will be embedding into the head sections of your website pages.
The Pixel base code and the Event Code
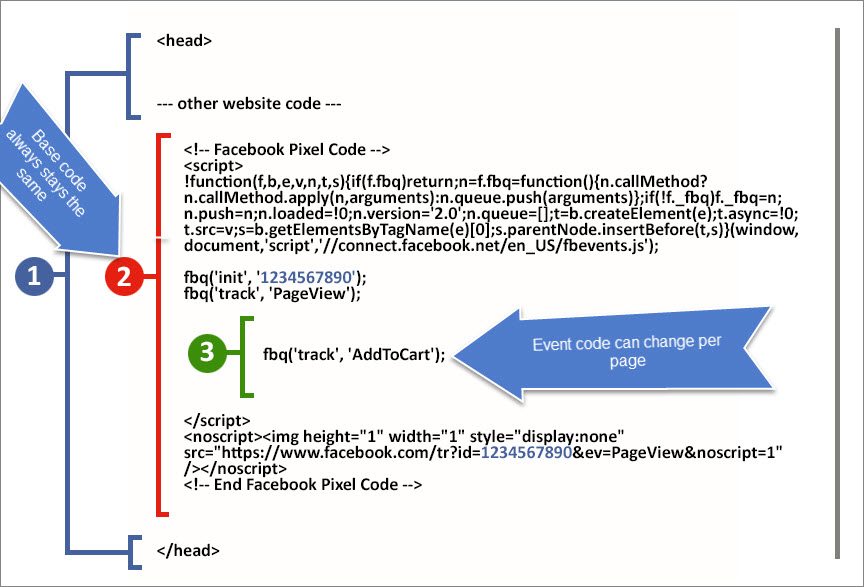
The pixel base code has to be the same on all pages that you want to track. The event code can change depending on the type of content you want to track on that page.
Now that the pixel code has been added to your website pages, the data will be sent back to your ads manager account where you can view the information and create targeted ads with it.
![]()
Facebook has created a special application called the Facebook Pixel Helper. When you have this installed in your browser you will be able to see if there are Facebook pixels installed on the web pages that you are browsing and if there are what types are being used. For more information on installing the Pixel Helper please click the link below. https://developers.facebook.com/docs/ads-for-websites/pixel-troubleshooting

Blogs are one of the key tools for growing your business online and influencing potential clients to use your brand.
Blogs are also the easiest, most cost effective way to spread awareness and encourage engagement.
Every time you create a blog post you are adding new content to your website, this causes your web site to change, which causes the search engine spiders to crawl it again to note the changes. It leads to your website getting more traffic and essential inbound links.
Social media sharing of your blog posts is also very important as it creates inbounds links back to your website, which is essential for a successful SEO campaign.
Blogging regularly also keeps potential clients coming back to your website to see your latest blog posts as well as keeps them on the website longer, which increases your chances of them using your service.
As noted above social media also plays a huge roll in the successfulness of your blog. Social sharing of your blog will greatly increase the reach of your blog to potential clients. In the case of Facebook if potential clients like the content in your blog they will like and share it with their friends on Facebook which will greatly broaden your business reach to potential clients.
This is one of the biggest questions that we are asked when it comes to blogging. And the answer is put content on your blog that is relevant to your business. Keep it simple, professional and keep the content high quality.
A short list of content that is excellent for blog posts:
If you are planning an event put up a post about that. If you’re a restaurant add a picture of your latest dish and write a paragraph or two talking about it. If you’re an auto mechanic you could write a blog post on why you need to do regular maintenance on your vehicle and provide a few tips.
You can also promote other businesses content on your blog page, make sure that they also share your content on theirs. You can greatly increase your brands together that way.
Be sure to always promote your services in your blog posts.
Some tips for a successful blog


